Results 1 to 15 of 200

Thread: Idiots guide to classic airgun strips (pt 1)

Hybrid View

Previous Post Previous Post   Next Post Next Post
  1. #1
    ggggr's Avatar
    ggggr is offline part time super hero and seeker of justice
    Join Date
    May 2008
    Location
    Flintshire Ch6 sort of near bagillt
    Posts
    2,348

    An idiots guide to pre war Diana 27 strip (pt 2)

    I made up a piston washer for this (and cursed sending one I had to someone a few months back). Everything is cleaned and lubed ready to go back together and assuming you have sorted the barrel plunger and spring and replaced it in breech. The breech washer was made up of very thin leather and soaked in almond oil and replaced. Fit piston washer to piston and replace in cylinder (someone on here suggested doing it dry and lubing after---I can see the point because of the difficulty getting past the threaded bit of the cylinder). Replace mainspring and cylinder end cap. Refit barrel and replace barrel pivot (I made up a locknut for this as well). Replace cocking arm and its pivot. Replace stock and nip up nut. Replace butt plate and 2 screws. Locate trigger spring and push trigger into housing and locate pivot screw. Replace trigger guard and then the trigger adjusting screw and locknut. If the gun wont cock becuase it feels as though the piston is hitting the trigger, you need to wind the screw in more. If it wont hold the piston then wind it out.
    stripped another of these and had a problem with the barrel plunger/barrel lock up. The barrel was drooping a bit. If you take the barrel plunger out of the breech block and file the rear of the cut out, this usually lets the plunger come out a bit more and lifts the barrel up. On this one I noticed some movement on the cylinder and investigated. There is a non sprung plunger in the end of the cylinder. I removed this and put a filed down shake proof washer behind it as a shim. This cured the barrel droop.
    Last edited by ggggr; 19-02-2013 at 11:43 PM.

  2. #2
    Join Date
    Dec 2003
    Location
    Cambridge UK
    Posts
    7,074

    Crosman 766 strip and rebuild

    Here are some notes I made when curing a 766 that would not pump up. As far as I could see the pump seal was OK so I needed to delve a little deeper. My problem was the O ring on the valve body. I did not strip the valve itself.

    CROSMAN 766 STRIP

    Taking apart.
    Remove barrel band (2 halves, single small screw goes though band)

    Remove barrel band ends: plastic, lifts away.

    Knock out the pin holding the pump lever to the pump tube.

    Remove pump lever with pump attached.

    Remove barrel: hex key on top of action.

    With the breech block on its side, screws uppermost, stock to the right, remove the 4 screws. Keep top plate in position while doing this.

    Gently prise the top plate off the bottom plate. Take care the pump handle plastic grip holder, black plastic sprung laden bit on left, does not ping out as you release the top plate. Top plate may come away with the trigger and safety catch or may leave trigger and safety in the bottom plate. Either way the trigger safety spring may become detached from its location on the safety. Do not worry. Remove trigger, spring and trigger pin.

    Note position of trigger sear components.

    Lift sear away, taking care not to lose the large spring that acts on the sear bar. Lift off the long spring and plastic peg that acts as the BB follower from its channel.

    The valve housing is held by a screw to the left of the valve housing. Before releasing this, note the brass component at the top of the valve body towards the left. This has a small spring over it. Release and remove the screw holding the valve housing but hold the housing in position. Now gently lift the housing away to the right, catching the small spring on the brass piece and also noting that the striker piece and a black plastic end body will be released under spring pressure on the right hand side. Just go slowly and this component will not be forcibly ejected. The brass valve body will slide out of the air cylinder. If it is an easy, loose slide then inspect the O ring as it will most likely be worn.

    If needed, replace O ring.

    Clean all parts, especially the air cylinder.

    I have not dismantled the valve.

    Rebuilding
    Reversal of above but these tricks may help.

    Assemble valve body and housing into place in the air cylinder. Have the brass component in place but do not fit spring yet. Take care that the striker and its spring and the black plastic end cap are located correctly. Replace the screw to hold the valve housing.

    Carefully replace the small spring over the brass component. There is just enough room to wiggle this over the component; it stays in place against the bottom plate.

    Refit trigger sears in place and slip the sear spring into place.

    Refit the pump handle retaining spring and catch ... take care it has a habit of falling out.

    Refit the trigger and its rod with the safety spring under the trigger and the hooked end pointing up. At this stage I found it best to hook a small bit of thin wire over the long arm of the spring and feed it towards the trigger such that when the top plate is replaced it protrudes out of the trigger guard.

    Replace top plate: a bit fiddly to do this and keep pump handle spring in place but persevere.

    When located, pull on the bit of wire to pull the safety spring long leg downwards ... look through the hole for the safety catch to see if it has cleared the hole. When it has, feed the safety catch back into place and release the spring. Pull the bit of wire out.

    Replace 4 plate screws.

    Refit barrel, and pump etc.

    Job done.

  3. #3
    ggggr's Avatar
    ggggr is offline part time super hero and seeker of justice
    Join Date
    May 2008
    Location
    Flintshire Ch6 sort of near bagillt
    Posts
    2,348

    Idiots guide to Baikal IZH 53M strip. (pt 1)

    I dont know if this is collectable but its a good plinker. I left the sights on when I stripped this. Undo the two frame grip screws on the sides and the one to the rear of the trigger guard (the one on the cap on the pistol grip can be left on) and lift the action out of the frame. I stripped the trigger down by remoing the sear coil spring and the trigger coil spring first. I then removed the middle pin that is a stop pin. I then took the front one out and removed the presse steel trigger and its actual trigger piece and small spring. I took the sear pin out and removed the sear from the front of the housing. I had to knock out the cocking arm pivot to enable me to remove the cocking arm from the cylinder. I undid the barrel pivot and removed the barrel. You can remove the small pin from the breech block to clean and lube the plunger and spring if you want. I put weight on the cylinder end plug and removed the pin and released the tension. Mainspring and piston came out. I didn,t change the piston washer which was a parachute washer on a boss. Clean and lube and put the piston and spring in and then replace the endplug and pin. Replace the barrel and breech and barrel pivot bolt. Go to pt 2

  4. #4
    ggggr's Avatar
    ggggr is offline part time super hero and seeker of justice
    Join Date
    May 2008
    Location
    Flintshire Ch6 sort of near bagillt
    Posts
    2,348

    Idiots guide to Baikal IZH 53M strip (pt2)

    Replace the cacking arm in the cylinder slot and replace cocking arm pivot pin. I peened this over a little after replacing it. Slide in sear and locate pin. Locate trigger and small spring and locate pin and then locate middle pin (stop pin). Replace the two big coil springs on the trigger and sear. Replace action in frame and replace the three screws.
    I find this to be a nice pistol. The instructions in the handbook are not much use. To adjust the elevation of the foresight, you have to press down on the blade so the small square of steel on the adjuster screw is out of its slot before turning the adjuster screw. I dont like the ratchet/antibeartrap device. I think if you struggle for a mainspring, a Diana 25 one would fit but I wouldnt swear to it. I fitted a small bit of tube inside the mainspring to act as a floating guide. If you know someone with a lathe, they could make up a longer cylinder end plug and tap it to take a shoulder stock.

  5. #5
    ggggr's Avatar
    ggggr is offline part time super hero and seeker of justice
    Join Date
    May 2008
    Location
    Flintshire Ch6 sort of near bagillt
    Posts
    2,348

    Idiots guide to Baikal IJ 38 strip (pt1)

    I reckon these are really well made.The cocking arms push onto a boss on the underside of the piston (like a B2 but better). Ive seen two of them so far,one had no scope rails but had a piston weight/guide in the piston and the other had rails but no weight/guide. Undo and remove two front stock screws and the one in front of the trigger guard and remove action from stock. Undo lock screw for barrel pivot and barrel pivot and remove. Remove barrel and cocking arm from cylinder but watch out that the barrel release catch and its spring dont fall off. You can remove catch and spring to lubricate. On mine the spring was a little short so I used a small screw down it as a spacer. If you want to get at the barrel plunger and spring, knock out the pin at the front of the cylinder. I will assume you will do that now and replace it. Knock the pin out from the rear of the cylinder and then place cylinder with the breech end down onto a piece of wood. If you now push onto the cylinder end cap and turn anti clockwise about 3/16 of an inch it will free the pin that locates on a recess in the cylinder and you should be able to release pressure.(I have seen a pin that has been knocked into the trigger housing. You can knock it further and it should drop out and you can replace it in the hole. Otherwise a small pin could be fitted if it is missing) Guide, spring, weight/front guide (if fitted )and piston shoul now all come out. Go to pt 2.


    EDIT----Ive recently seen one of these that was different to others Ive seen. It had no barrel catch and the breech seal was on the end of the cylinder and not on the barrel. Stock screws were crossheads instead of slots. It had scope rails and the guide looked a little different to the others I've seen.

    Another EDIT. It seems that up to the late 80's they still had the barrel catch as someone recently said

    "A friend of mine used to work at a place called Country Skittles near Townshend in Cornwall in the mid 1990's, where one of his jobs was operating an air rifle target range.

    The guns used were Baikal IJ38's, but these were the version without the thumb latch and with a seal in the standing breech face rather than on the barrel, the stocks were wood although had a slightly different shape without any schnabel style tip on the fore-end.

    I believe these were a later version of the IJ38, as I had bought one a few years earlier (late 1980's) that had the thumb latch to break the barrel. "
    Last edited by ggggr; 30-12-2020 at 05:41 PM. Reason: Another EDIT

  6. #6
    ggggr's Avatar
    ggggr is offline part time super hero and seeker of justice
    Join Date
    May 2008
    Location
    Flintshire Ch6 sort of near bagillt
    Posts
    2,348

    Idiots guide to Baikal Ij38 strip (pt2)

    You dont have to touch the trigger if you dont want to. It has two coil springs, one for the trigger and one for the sear. This goes between the sear and the anti beartrap bar. Piston washer is leather and held on by a 5mm countersunk head screw. Clean and lube. Replace piston, front guide/weight (if fitted),spring and guide. The mainsprings are quite soft in these guns, fat but with coils close together. I dont know if you can get them but I tried a old mainspring (maybe from a meteor) and it went in and upped the power a fair bit. Ive since taken it out and tried one about 1/2 inch shorter and this is closer in power to the original. Push trigger block into cylinder and turn clockwise until pin locates in cylinder recess. Replace cylinder end pin, taking care to line up the hole in the trigger as the trigger pivots on this. Fit your barrel catch spring and catch and locate barrel in breech jaws and cocking arm onto piston. You may have to fiddle about getting the anti beartrap bar into place as its quite springy. Replace barrel pivot screw and lock screw. Drop action into stock and tighten the 3 stock screws.
    As said, a well made rifle and I think it will take the meteor spring with no problems if you want the extra power.

  7. #7
    Join Date
    Dec 2003
    Location
    Cambridge UK
    Posts
    7,074

    Update on the Original/Diana Mod 50 or any 3 ball trigger rifle

    I recently needed to strip and reassemble another Original Model 50. Getting the 3 ball trigger unit back in place is an art in itself but I did find what I thought was an easier way.
    I give here both methods: (numbers refer to earlier thread stages)
    8. Re-assembly:
    Method 1: Rifle in spring compressor. Fit mainspring and guide. Put the inner sleeve into the outer sleeve ... the inner sleeve needs the ‘join’ pointing towards the trigger slot and the outer sleeve has obvious cut outs for the trigger unit to fit. The outer sleeve fits with the open slot towards the end cap. Using the socket, compress the mainspring / sleeves until a small diameter nail passing through the rear spring retaining pin hole can be used to hold the tension. At this point refit the small spring and keeper to the top of the cylinder (under the scope rail). Carefully lever the inner sleeve down to gain space to fit the spring and push the keeper/spring
    into location with a screwdriver.

    Method 2: Fit mainspring and guide. Put the inner sleeve into the outer sleeve ... the inner sleeve needs the ‘join’ pointing towards the trigger slot and the outer sleeve has obvious cut outs for the trigger unit to fit. Assemble inner and outer sleeves with the small spring and keeper in place; the spring buts up against a flange in the outer sleeve while the ‘spring and keeper end’ slots into a slot in the inner sleeve with the keeper held in the end of the slot. The outer sleeve fits with the open slot towards the end cap.The spring is under some tension at this point. Hold unit together and fit over mainspring and spring guide. It is better to have the action with the scope rail upwards at this point. Compress the mainspring using the socket as above. The outer and inner sleeves will move inwards. Keep the small spring and keeper in place. When sufficiently into the cylinder, the small spring and keeper become captive.

    9. Refit the proper pins to hold mainspring.

    10. Refit trigger unit
    Method 1: first fitting the pin. Then push the outer sleeve back to allow the trigger to fall forward before refitting the trigger spring. This can be most easily be done by using a small flat blade to push the outer sleeve rearwards until you can see the end of the outer sleeve down towards the mainspring slot. It is possible to insert a small flat screwdriver blade into the small gap to retain the outer sleeve against spring tension and so allow the trigger to fall into place, cocked. The trigger spring is best fitted by fitting the end over the ‘cylinder pip’ then compressing it with a large flat blade screwdriver until the end of the spring is flush with the trigger unit flange. Take care not to let the spring ‘ping’ away.Now slide the spring into place in the trigger unit.

    Method 2: Hold spring in place on trigger unit and hold in location on the action. Push down on trigger/spring to compress spring and bring the holes in the trigger housing into line with those in the action. Insert a small drift through the holes to hold it in place. Then tap the pin through. It may be necessary to wiggle the housing to get the holes on the second side to line up ... but I found this method is less hassle and more ‘blood free’ than trying to compress the spring as in method 1.

    11. Refit the anti-beartrap bracket (if fitted). Replace the end cap.

    12. Put action back in stock and refit the underlever pivot bolt.

    13. Refit the retaining ring on the underlever catch bolt.

    Cheers, Phil

  8. #8
    Join Date
    Dec 2003
    Location
    Cambridge UK
    Posts
    7,074

    Asi statical

    ASI STATICAL STRIP

    A cosmetically fair .22 Statical was in dire need of internal attention: pushing out between 70 and 100fps with Superdomes. The breech seal was clearly a bit tired but I had a surprise when I removed it: it was about 1cm deep. I simply shimmed the inside to raise the outer lip just above the breech. Power rose immediately to around 200fps. But the cocking stroke was too easy ...
    To strip:
    1. Remove forend woodwork, 2 bolts. Remove trigger guard, 1 bolt.
    2. Remove action from the butt and crackle finish outer housing: 4 small cheesehead bolts on the underside.
    3. It is now best to remove the rear sight, noting how it all fits together.
    4. Note 2 sliding bridges on the action: one near the trigger the other near the breech. On our model the sliding bridge near the breech had a small spring on each of the 'slide rods' but I have heard recently of a model (possibly a later version) that did not have these but had O rings.There is no need to touch the breech one unless you really want to strip that unit as well.
    5. Remove the saddle bridge near the trigger housing by removing 2 circlips on each of the 4mm sliding rods. Push rods out of the way and remove the saddle, sliding it off the anti-bear trap bar that extends from the cocking lever. On the 'other model' mentioned above it appears there was an extra small spring here to drive the recoil mechanism.
    6. Remove 2 pins holding trigger housing in place. Look inside the housing and note that the pins have a knurled end. Drive pins out knurled end first. Trigger housing can now be pulled away but it may be tight.
    7. The mainspring is next. I advise using a spring compressor. With a suitable tool (a bit of dowel?) inserted in the end of the cylinder, take up the strain on the end block and undo the 6mm hex bolt holding the saddle slide arm bracket to the action. Remove.
    8. Slowly release tension on spring as it pushes the end block out. Remove end block and spring. There is a free floating spring guide.
    9. The piston can be removed by simply lifting the cocking arm out of its slot: no need to discontent anything from the action.
    10. The piston washer is a standard leather one. This one was fair ... a not tight fit in the cylinder with the piston falling slowly under its own weight but almost stopping when I put a thumb over the muzzle. A new washer could easily be made.

    The spring fitted to the test rifle was 31 coils of 3mm wire (93mm total space) and was very weak: it was almost possible to compress it by hand.
    I replaced it with 29 coils of a Webley Tracker spring, 3.2mm (92.8mm space). I tried a few modifications such as a fixed spring guide but found the 93mm measurement critical. Exceed it and the rifle does not cock. In the end I stayed with the floating spring guide and a 29 coil spring.

    Reassembly is a reverse of the above. Fit piston and spring with spring guide inserted. Then fit the end block. Use the pusher tool to push the end block into the action and compress the spring until the 6mm hex bolt hole lines up with the hole in the action. Refit saddle and 6mm bolt.
    Remove tool and refit trigger unit, making sure the pins are fitted the way they came out with the knurled part last to be tapped home.
    Refit the cocking arm into the piston slot.
    Refit sliding bridge, making sure the anti-bear trap arm fits inside the bridge. Slide the pins into place and secure with the 4 circlips. Check that the bridge slides freely.
    Refit action to stock. This can be a little fiddly. Look at the underside of the action and note some raised pimples on each sliding bridge. These locate in small holes in the crackle finish housing. I found it easiest to locate the pimples at the breech end first; the rifle has to be at just the right angle and spacing in order for the action to slot into place. Persevere and it will suddenly click. Replace the 4 small bolts to secure the action. Replace trigger guard and forend woodwork. Replace rear sight.
    Once completed and relubed, the test rifle was running at around 450fps with .22 Superdomes for approx 6.5ftlbs. The F in Pentagon mark indicates 7.5 Joules (5.5 ftlbs) for countries that have this lower restriction so I do not think this is too bad.
    Cheers, Phil
    Last edited by Phil Russell; 11-03-2011 at 03:31 PM. Reason: extra information

  9. #9
    Join Date
    Dec 2003
    Location
    Cambridge UK
    Posts
    7,074

    Asi gamo apache

    Results of a morning's entertainment:

    ASI GAMO APACHE

    A spring compressor is virtually a must for this rifle due to the fact that refitting the trigger unit is a bit fiddly and best done with two hands free and the action secured.

    To strip, remove the forend stock screws (2) and the large bolt at the rear of the trigger guard. Action now separates from the stock, leaving the trigger guard on the stock (no need to remove unless you want to).
    Remove the plastic end cap, noting the nut inside into which the trigger guard bolt fastens. Remove rear sight.

    Look into the end of the action and note that the trigger unit holds back the spring guide and spring. Memorise how the trigger unit looks when assembled into the action. It will come out as a complete unit so will not fall apart. To remove the spring you need a forked tube able to go either side of the trigger block. With action trigger uppermost in a compressor, place the prongs of the forked tube either side of the trigger block and take the spring strain for about 5mm until you can see the lugs on the trigger unit clear the cylinder body. It is now possible to pull the trigger unit up and out of the action. It can be stiff so a bit of twiddling may be needed.
    Release tension on the forked tube and the spring assembly comes out.

    To access the piston assembly the cocking arm needs removing. You could tap out the pivot pin at the breech end or separate the breech/barrel from the cylinder. If doing the latter, undo and remove the bolt and separate the breech from the breech jaws. They have a bearing surface in the jaws so can be tight to remove.

    The piston washer is leather, secured by a screw bolt.

    The trigger unit can be easily cleaned and does not need taking apart. The breech seal is easily removed and is about 1cm deep. If the upper face is worn, carefully remove the seal with a needle and try a card shim under the seal.

    Re-assembly is straightforward: fit piston into the action and refit the barrel/cocking arm. This can be a bit of a fiddle as the breech side bearings can be a tight fit. Take care as this is a potential blood letting exercise if the parts slip when you are trying to push the breech into the jaws; there are some sharp edges.
    Place action in compressor, trigger slot uppermost, and refit spring and spring guide. Take the forked tube and compress the spring until the spring guide is clear of the trigger slot. Make sure the arms of the forked tube do not obstruct the trigger slot.
    Refit the trigger unit, making sure the trigger spring locates inside the cylinder. It helps to keep the trigger ‘pulled back’ while doing this. It can be fiddly. Make sure trigger unit is fully home into the cylinder and that the lugs locate into the cylinder body. Release tension on the forked tube / spring and watch carefully as the spring tensions against the trigger housing. The trigger housing should be fully into the action at this point. When done, examine the end of the action: one leg of the trigger spring should be resting on the inner surface of the action and the trigger housing end should be at 90 degrees to the cylinder. Make sure the other end of the trigger spring fits inside the rear of the trigger and that the trigger works. Make sure safety catch can rock.

    Replace end cap. Fit action into stock. It will most likely be necessary to pull the safety catch towards the trigger unit when doing this in order to get the catch through the trigger guard. Refit stock securing bolts and rear sight. Oil all pivot joints.

    Cheers, Phil

  10. #10
    ggggr's Avatar
    ggggr is offline part time super hero and seeker of justice
    Join Date
    May 2008
    Location
    Flintshire Ch6 sort of near bagillt
    Posts
    2,348

    Idiots guide to Original 5 strip (pt1)

    This is a very basic strip to change mainspring and piston washer/ clean and lube but without removing the trigger adjuster set up. Remove sights from gun. Remove small lockscrew from cylinder end cap. You may want to try to loosen the end cap a few turns now before removing action from grip.(I used padded water pump pliers but a vice would be better). Undo and remove the screws at the front and rear of the trigger guard---there is no need to undo the one that holds the cap on the base of the grip. Lift action out of grips. Hook the coil spring off the sear and the sear should slide out backwards as it is hooked on a pin rather than a pin passing through a complete hole in the sear. Look at the trigger and trigger spring before you tap the trigger pivot pin out (the idea is to leave the spring on the trigger when it comes out and to push the long leg of the spring down and slide it forwards into the housing when you reassemble the gun). Remove pivot pin and slide trigger and spring out. Knock out the cocking lever pivot pin and then undo the barrel pivot lock screw and barrel pivot and remove. Barrel and breech and short cocking link should now slide out of the jaws. Watch out for the shims on either side. You can.t do much with the barrel lock up without special tools so its just a clean and lube. Long cocking link should slide out of front of trigger housing. Go to pt2
    Cooler than Mace Windu with a FRO, walking into Members Only and saying "Bitches, be cool"

  11. #11
    ggggr's Avatar
    ggggr is offline part time super hero and seeker of justice
    Join Date
    May 2008
    Location
    Flintshire Ch6 sort of near bagillt
    Posts
    2,348

    Idiots guide to Original 5 strip (pt2)

    You should now carefully unscrew the cylinder end cap making sure it doesn,t fly. With cap undone, the sleeve,guide and mainspring should come out. You may need something to ease the piston out. The piston seal on mine was a parachute seal which looked ok. If it needs replacing you will probably need to dip the new one in hot water for a few seconds before fitting. Clean and lube the gun. Refit the piston,mainspring, guide and sleeve (mine had a small hole for the end cap locating screw to go so make sure if it has one that it,s in the right place) and then screw on the end cap. This may be a bit difficult so make sure you dont cross thread it. Tighten cap and replace it,s locating screw. Replace the long cocking link and then the barrel/breech/shim set up and replace the barrel pivot screw and lock screw. Line up cocking links and replace its pin. (mine was slightly bent because some chimp had fitted a big mainspring). Slide trigger into housing and push down long leg of spring (see pt1) so the trigger can slide into place and then refit its pivot pin. Slide sear into place with the hooks over its pin and then refit its spring. On mine this was a bit tricky and took a couple of small screw drivers although I think some models had a screw you could unwind to get the spring in and then retighten. Drop action into grips and refit the screws at front and rear of trigger guard and refit sights.
    Cooler than Mace Windu with a FRO, walking into Members Only and saying "Bitches, be cool"

  12. #12
    Join Date
    Jan 2009
    Location
    swindon
    Posts
    365
    hi
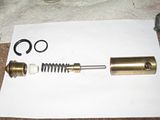
    thanks for sharing this strip down for the crosman 766,and here is a pic of the valve

    many thanks

    Davy

Posting Permissions

  • You may not post new threads
  • You may not post replies
  • You may not post attachments
  • You may not edit your posts
  •