Results 1 to 4 of 4

Thread: CyberGun Mini Uzi/Swiss Arms Protector 4.5mm BB Review

  1. #1
    Join Date
    Aug 2014
    Location
    Louth
    Posts
    63

    CyberGun Mini Uzi/Swiss Arms Protector 4.5mm BB Review

    CyberGun Mini Uzi/Swiss Arms Protector 4.5mm BB Review


    Packaging and Contents

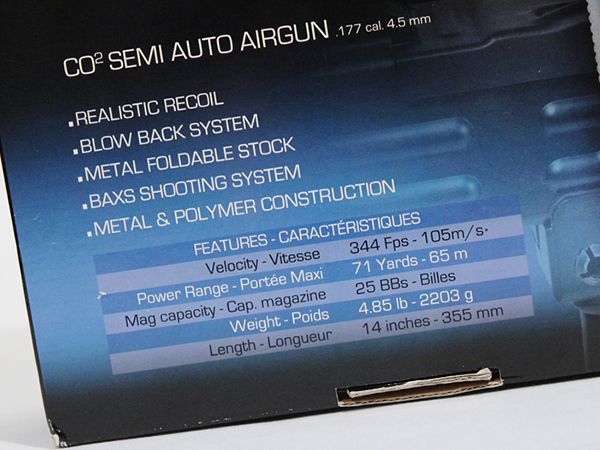
    Today we'll be looking at the CyberGun Mini Uzi. The gun is also known collectively as the Swiss Arms Protector. The two guns in fact come in almost identical packaging, with the Swiss Arms having something of a red theme and the CyberGun we're looking at today favouring the blue. The packaging itself is heavy duty card with the exterior depicting images of the Gun within along with details of the specification and key features. Up at the top, beside licensed Mini Uzi name are the all important words "Blow Back", meaning that this little lump will rattle in your hands when you rock and roll


    CyberGun give the velocity at 344Fps, equivalent to 105m/s, all of which means if you're firing a bb that weighs 0.35G ir 5.4 Grains then you can expect an energy of 1.42 foot pounds. This is by no means high by pellet pistol standards but none to shoddy for a full blowback Semi Automatic, especially when you consider just how much metal is being shifted around inside the Mini Uzi. As required by some laws they also give the maximum power range as 71 yards or 65 metres.


    On the edge of the box CyberGun detail the various organisations distributing the product


    Lifting the lid we fing the mini Uzi nestled in polystyrene packaging. the gun is securely held, but can be a bit of a pain to get in and out. We think if you're going to be a long term owner of this particular gun you're most likely going to want to invest in an egg box lined plastic hard case.


    Along with the Uzi itself the box also contains a 25 round magazine, a spare magazine end cap, along with the allen key to insert and remove it, a front sight adjuster and a complimentary box of 4.5mm CyberGun Branded metal bbs.


    The magazine is a hefty bit of kit. Of all metal construction, it probably weighs about the same as the one from the Israeli arms original it intends to copy. There are marks on the outer edge giving five round increments as they would on the original real steel version, along with two raised sections that prevent over insertion of the magazine into the receiver.


    Along with housing the bbs, the magazine also holds the CO2 capsule. The capsule is inserted by removing the end cap seal, inserting the capsule and then tightening the end cap with the supplied allen key. The end cap itself is plastic and although robust CyberGun do actually include a spare almost as if they know you are going to over tighten it at some point.


    The bbs are inserted into the top of the magazine necessitating that the magazine spring be held back with the other hand. To be honest it's a bit of a fiddle, but we're sure there are speed loader solutions out there waiting in the winds.

    Last edited by Boaz; 03-01-2015 at 12:59 PM.

  2. #2
    Join Date
    Aug 2014
    Location
    Louth
    Posts
    63
    CyberGun/Swiss Arms Protector Mini Uzi Review

    Moving now to look at the gun itself we see that it looks almost identical to the real steel original, with the exception that there are more than a few plastic parts to found on the CO2 version. Looking at the image below, with the exception of the top cover, barrel, hop up adjuster, magazine and folding stock everything else is plastic. This we think is a bit of a shame, but then it does help keep costs down. Rest assured if you really want the all metal feel then Aluminium lower receivers and pistol grip assemblies can be had for in the region of £150


    With the Magazine in situ and the stock folded the gun is approx 360mm long and 235mm deep, with a thickness of 50mm, 10mm of which is accounted for by the folded stock.


    Looking at the Uzi in more detail we'll start at the front and work our way rearwards. The muzzle benefits from a vented outer barrel shroud, behind which we find the barrel retention nut which doubles as the hop up adjuster. The small protuberance above the barrel retention nut is used to provide increments for the hop up adjuster, depressing it enables returning the adjuster to it's default position. The fore Grips are held in place by steel bolts but they themselves are plastic.


    The pistol grips, trigger guard and trigger and entire pistol gip assembly are also plastic but done so well as to look and feel like metal. A fire selection switch offering safe, semi auto and fully automatic fire is situated towards the top of the grip. This selector is not ambidextrous. In order to comply with legislation in various countries including the UK, on this version the fully automatic fire capability is disabled by means of the selector being mechanically blocked from accessing it. Anyone researching this gun will likely know that this can be defeated, however it would not be appropriate or for that matter legal for us to go into detail as to how this is accomplished.


    The rear of the pistol grip has a 1911 style safety necessitating a firm grip on the gun for it to be disabled. When you shoot the Uzi and feel the recoil generated by the blow back mechanism you'll be thankful of your firm grip.


    At the base of the pistol grip we find the magazine release catch. These are simple in operation but have come in for a fair bit of stick over the years owing to the release springs failing or becoming weak. Thankfully release springs can be had readily on line.


    The reverse side of the pistol grip is largely devoid of features as it would be with the actual Mini Uzi.


    The hinge for the folding stock also doubles as a sling swivel, it's partner being just below the fore sight on the opposite side of the gun.


    Opening the all metal folding stock adds another 240mm to the length of the gun. The Stock is ergonomically shaped and in use is actually surprisingly comfortable. Although the stock doesn't lock in place as such indentations of the hinge mechanism give it a degree of stability in the open position.


    Thankfully not only is the Mini Uzi largely devoid of intrusive warnings, but those that are present have been sympathetically placed so as not to intrude into, and detract from the authentic aesthetic. Here for example we see the main warning positioned underneath the rear of the receiver area immediately in front of the folding stock hinge. To be honest, if you didn't go looking for it you wouldn't find it.


    The only other text on the gun is present on the upper cocking leaver slide. The cocking leaver itself has a ground out section as it's necessary to look through it when aiming down the sights. The Whole of the top cover, including the cocking handle are metal so should last a good while.


    The rear sight is identical to the real version of the Mini Uzi offering a hinged battle sight set up, each of which has a different sized aperture. In reality, we're hard pushed to tell the difference between them but it's a nice touch. The rear sight also offers some slight windage adjustment


    The fore sight is adjustable for elevation via the supplied tool. In reality though we suspect that you'll never adjust these sights at all as firing bbs though a very short smooth bore barrel it's not exactly a sniper rifle and it's doubtful how much of an effect adjusting the sights will have on your accuracy.

    Last edited by Boaz; 03-01-2015 at 01:00 PM.

  3. #3
    Join Date
    Aug 2014
    Location
    Louth
    Posts
    63
    Stripping, Servicing and Conclusion

    The CO2 version of the Mini Uzi field strips in much the same way as the real version. The first step being to push the ramped top cover retaining bracket rearwards. This takes quite a bit of force, with a good chance of having a nail broken in the process.


    Having released the rear f the top cover it is lifted up from the back with the front of then being slid out from under the front sight area. Re-fitting it is the same process in reverse with either a firm push or gentle "Karate" chop pushing back the rear spring retaining ramp and allowing the top cover to be again held in place.


    With the top cover off we get our first view of the heavy metal bolt mechanism that accounts for the recoil felt when this gun is fired. This bolt can be removed by moving it rearwards approximately 30mm so as to clear any obstructions. it is then lifted out front end first.


    The underside of the top cover shows a need for additional lubrication, we recommend a good gun grease that will adhere to the underside without dripping off.


    The floating bolt assembly can also be stripped down with it being a good idea to lube up all moving parts. The exterior of the floating bolt should also be well lubed as it will need to move freely inside the receiver when in use. Our experience of this gun has been that it is rather prone to jamming if not kept absolutely soaking wet with lubricants.


    With the bolt out we can see down into the lower receiver and out through the magazine well. There's not actually a lot going on in here however the breach can be seen exposed central to the image.


    Another view of the breach area showing how the magazine engages essentially forming the transfer port. For those hoping for details of how to modify the gun for full auto, there's a reason why we've not shown too much detail of this area.


    Conclusion

    To say we have been pleasantly delighted with the Cyber Gun Mini Uzi would be a bit of an understatement. In use the gun is a joy, with the heavy metal floating bolt hammering back and forth providing the shooter with a real feeling of judder and recoil . In semi automatic mode the gun will fire as quick as you can pull the trigger, giving a feeling of near fully automatic fire. We found that we would get roughly 75 rounds from a full 12g CO2 capsule if we took our time, with this dropping to about 40 rounds if we hammered them out as fast as we could. Allowing the gun to warm back up a bit did give us a few more shots but not nearly as many as we got when we took it easy. But hey, who wants to take it easy, this is an Uzi, not a match air rifle. Cocking the gun feels realistic, with a good weight and resistance being felt from the cocking lever, a bit disappointing though that the bolt does not "hold open" when the last shot is fired, but hey we can't have everything can we.

    On the negative side we would like to have seen a few more metal parts being used, in particular the lower receiver area would benefit from being more robust. Granted aftermarket Aluminium receivers are available but it would have been nice to have this out of the box as it were. The only other real bug bear with the mini Uzi was its propensity to jam, and jam a lot. This we eventually discovered was due to woefully low levels of lubrication at the factory, and saw us servicing the gun after only 4 magazines leaving it dripping wet and ready for action.
    Last edited by Boaz; 03-01-2015 at 01:01 PM.

  4. #4
    Join Date
    Mar 2012
    Location
    wakefield
    Posts
    547
    Very useful guide thanks for all the detail and photos Boaz.
    Troy

Posting Permissions

  • You may not post new threads
  • You may not post replies
  • You may not post attachments
  • You may not edit your posts
  •