Registered User
it varies on the pumps you put in
i'll see if i can find a shot string i did comparing the power to pumps with a std piston and an adjustable piston fitted with a lighter spring and adjuster
Registered User
Registered User
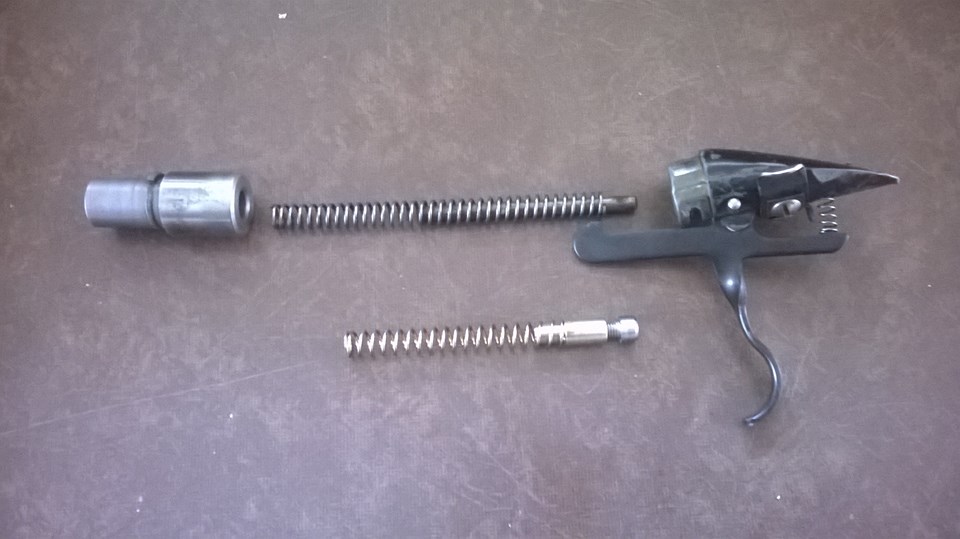
this is the spring and adj that was fitted to the gun for those results
for this streak it needed only a little extra preloade
 Registered User
Very good! The two mods compliment each other.
Registered User
So 10 pumps you get two shots of (almost) same velocity ? If so that is very good going
Custom BSA S10 .22 PAX Phoenix Mk 2 .22 Custom Titan Manitou .22 (JB BP) HW77 .22 FWB Sport Mk1 .22 Sharp Ace .22 Crossman 600 .22 Berretta 92 .20 Desert Eagle .177
Registered User
the adj piston is just going back to exiting sheridan parts fitted to the pre 65? guns
the spring adj is just the best way to limit power output but they do work well together
the only down size is low pump shots and having to dey fire to release retained air but if you tune the spring to the poweroutput needed it is possible to get consistant fps using as an ACP set up i feel sure
Registered User
I got the Sheridan C-series back together after a fair amount of work and chronographed it.
With the restricted valve body still being used I wanted to see what it could reach with just cleaning polishing and new seals. It came up a couple of ft-lbs to 9.2 ft-lb and may increase a bit more with adjusting the new piston,which is currently at 1mm longer than standard. At some point I think I will want another 2 ftlbs so it will require another valve body without bleed holes to reach it.
Removed burs around the port holes and polished the valve stem neck and aligned one of the ports up correctly with the receiver port.
Cleaned the cylinder and polishing the valve head with a 12bore cleaning rod.
The valve seats had a couple of gouges and had to be smoothed out with fine grit sand paper on a crossbow bolt.
Registered User
that's polished up well
i made a delrin tool to polish up both the inlet and the exhaust body sealing areas
i made this for a 64 model that some wally tried to drift the valve out resulting in me having to take .030" off the inlet seal face and re cut and .120" off the exhaust body sealing surface
a power drill and varing grirs was used for the inlet and i took a lot of the material of the exhaust body seal face with a milling cutterthem lapped it by hand
the 64 is one of my favourites and i managed to get a period correct stock sent over from Tim at Mac 1 as i bought it as just an action
Registered User
All the Dans are worth saving but early 60s ones don't come up often now.
That's a good idea with the Delrin, I was thinking what could I use and I was going get some wooden dowel rods. They would certainly be a great help in a reseal kit getting everything sealing up well.
I'll measure the diameters of the inlet seal carrier, valve body, valve nut and piston to make up 4 polishing rods.
Originally Posted by --ped--

Registered User
to keep it square machine from 20mm rod and you can make a section the same diameter as the tube bore which will then keep it aligned
Registered User
If another Benji or Dan comes my way, I'll message you to see if you could make some rods up for me.
One that could be threaded onto a shotgun cleaning rod would be really effective.
Registered User
I found a .22 multipump to add to the .177 and .20. It's a Benjamin 342 made in around 1980 in St Louis. I had seen a few .177's (347) but held out for a .22. It's in good original condition with most of the black finish still present. The owner said he had it from new, it holds air but not for very long and it doesn't look like the valve has been opened up before, so I'm expecting lots of gunk and hardened seals.
The pump arm was creaking when pumping it up and I thought maybe the rivet has had it. It may have a lot of wear because it doesn't look like the gun has had much lubrication. I cleaned a lot of gunk out around around the rivet and let it soak in WD40, then another clean and several drops of Secret Sauce oil has made the creak go away.
Last edited by ratbuster2240; 07-03-2021 at 03:22 PM.
Registered User
The inlet seal is rock solid and deformed, I'll try a Sheridan inlet seal carrier with a poly seal and it should last another 40 years.
The valve stem seal is also very deformed, the gun may have been over pumped but the owner said he never did go over 8 pumps. I have a spareAS2250 valve stem but it will need slimming down to fit inside the valve spring. It's quite clean inside the cylinder and no usual hardened grease.

Registered User
looks to be in good nick
the bengy valve spring is for a 1/4" stem seat ,the last one 347 i did i fitted a disco stem and a sheridan spring with the same inlet seal and carrier
looks like it's had it's hammer spring badly chopped to limit it
Registered User
Thanks Ped, the brass inlet seal carrier is one you machined, when I opened up the 397 Ilearnt from the factory they started fitting these as standard in Benji's.The as2250 stem now fits but it sits very shallow in the valve spring. My 347 and sheridan both have the disco valve.
 Posting Permissions

 Reply With Quote